anchorComponent Playgrounds
You might be wondering "Why would would I need something like this? I can just test my components in the app!" and you're right. But imagine building a reasonably large application with dozens of routes, hundreds of components and thousands of possible component states. Checking all of these component states manually on the different routes that they are appearing on is a very time consuming task. A component playground solves this by allowing you to display multiple component states next to each other on a single page to give you a much better and quicker overview of how the component will look like in the end.
Another big advantage of using component playgrounds is that it forces you to build reusable components that are isolated from the app's business logic and layout. That means they don't depend on any state or actions in your controllers, routes and ideally services, but only on the data and action handlers that are passed into them.
If you want to know more about why component playgrounds are useful in general I recommend reading this great blog post "UI component explorers — your new favorite tool" by Dominic Nguyen that explains the benefits very well.
anchorInstalling ember-freestyle
Installing and configuring ember-freestyle correctly is unfortunately a little complicated right now so if you want to take a look at the final outcome, you can skip forward to the "Using ember-freestyle" section for now.
Before we start installing anything we should make sure we know what situation we would like to be in at the end. Our plan is to use ember-freestyle to generate a component playground at the /freestyle route, that is only available during development and does not affect the final asset sizes of the production build.
Let's start by following the official instructions on the ember-freestyle website:
ember install ember-freestyle- Add
this.route('freestyle');to theapp/router.jsfile
anchorAdjusting the application template
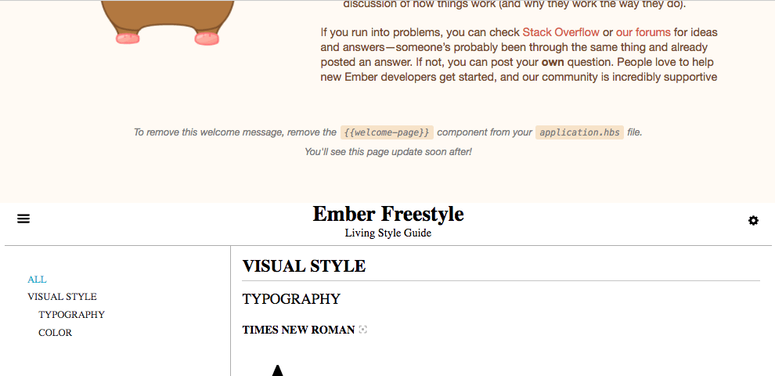
If you try this in a fresh new Ember app, run the development server using ember serve and visit http://localhost:4200/freestyle you will notice the first problem: The ember-freestyle components are appearing underneath the NaN component:

This is obviously not what we want. To fix this we will need to adjust the app/templates/application.hbs file and wrap the existing contents in a condition:
+{{#if onFreestyleRoute}}
+  {{outlet}}
+{{else}}
 {{!-- The following component displays Ember's default welcome message. --}}
 {{welcome-page}}
 {{!-- Feel free to remove this! --}}

 {{outlet}}
+{{/if}}
onFreestyleRoute is a property on the application controller that will be set to true once we visit the /freestyle route and and back to false once we leave it again. This can be implemented in the app/routes/freestyle.js file, and since that does not exist yet, we can generate it using ember generate route freestyle (choose not to overwrite the existing template!) and then adjusting it like this:
export default Route.extend({
  activate() {
    this._super(...arguments);
    this.controllerFor('application').set('onFreestyleRoute', true);
  },

  deactivate() {
    this._super(...arguments);
    this.controllerFor('application').set('onFreestyleRoute', false);
  },
});
If you check /freestyle again you should see that now the only thing that is displayed is the ember-freestyle guide. 🎉
anchorRemoving ember-freestyle from the production build
Once you try to ship this to production you might notice another issue: your asset size has increased significantly, so it seems that ember-freestyle is not disabled for production builds by default. Let's fix this!
According to the ember-freestyle documentation we are supposed to "blacklist" the addon in the ember-cli-build.js file of our app:
module.exports = function (defaults) {
  let environment = process.env.EMBER_ENV;
  let pluginsToBlacklist =
    environment === 'production' ? ['ember-freestyle'] : [];

  let app = new EmberApp(defaults, {
    addons: {
      blacklist: pluginsToBlacklist,
    },
  });

  return app.toTree();
};
Great! Now our asset size is back to normal. Wait... it is smaller now, but still not quite back to what we had before. 🤔
The code above only removes all the components from the build that ember-freestyle brings with it itself. That means components like NaN and NaN are no longer part of the production build, but the freestyle controller, route and template are still included.
The solution to this problem is moving the freestyle files into a dedicated in-repo-addon and then blacklisting that one too. First we generate a new in-repo-addon using ember generate in-repo-addon freestyle. After that we move app/controllers/freestyle.js to lib/freestyle/app/controllers/freestyle.js and do the same for the freestyle route and template.
Next we will add our new freestyle in-repo-addon to the pluginsToBlacklist list above:
let pluginsToBlacklist =
  environment === 'production' ? ['ember-freestyle', 'freestyle'] : [];
Finally we need to adjust the paths that ember-freestyle uses to search for the code snippets that show how the component is used in a host application. For that we will add a snippetSearchPaths property in the ember-cli-build.js file:
let app = new EmberApp(defaults, {
  // ...
  freestyle: {
    snippetSearchPaths: ['lib/freestyle/app'],
  },
});
If you now restart the development server and check the /freestyle route you should see that everything is working as before, but if instead you run ember serve -prod you will notice that you only see a blank page because the freestyle controller, route and template are no longer available. If you would like to use your default 404 page instead you can put the this.route('freestyle'); call in the router.js file in a condition that checks if (config.environment === 'development').
This leaves us with only the single condition in the application template and the this.route('freestyle'); call in the router.js file that we ship to production. While we could put in some effort to remove those too the situation is good enough and we can finally focus on putting content into our new component playground! 🎉
anchorUsing ember-freestyle
The good news is that using ember-freestyle is much easier than setting it up correctly!
Let's pretend we are writing a component called styled-button. We can create a new file at app/components/styled-button.js and put the following content in it:
import Component from '@ember/component';

export default Component.extend({
  tagName: 'button',
  classNames: ['styled-button'],
});
In addition to that we'll add some styles for this button to our app/styles/app.css file:
.styled-button {
  border: 1px solid #eee;
  border-radius: 3px;
  background-color: #ffffff;
  cursor: pointer;
  font-size: 15px;
  padding: 3px 10px;
}
Finally we will add the button to our component playground by editing the lib/freestyle/app/templates/freestyle.hbs template:
Hello World!
😀 😎 👍 💯
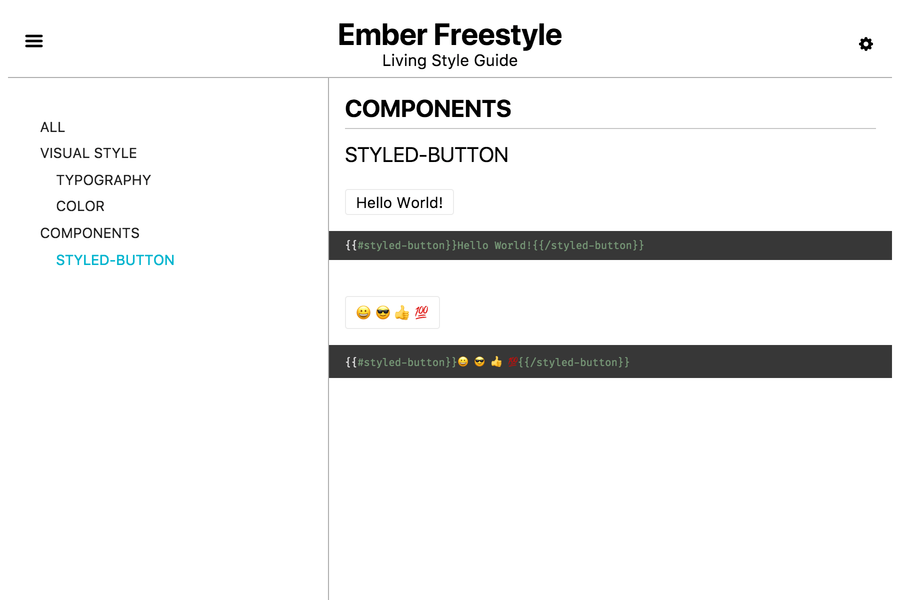
If we now visit http://localhost:4200/freestyle we will see a new "Components" section in the sidebar on the left that includes our "styled-button" subsection. Once we click on that we will see our styled-button usage examples including the snippets there were used to display them:

As this blog post has gotten much longer than intended already I'll leave it up to your imagination what other things you can put into such a component playground. In a follow-up post we will soon discuss how to extract subsections into components and how to automatically discover and inject them into the main template.
Finally I would like to thank Chris LoPresto and the other contributors for working on ember-freestyle and would encourage you to give it a try!
