anchorIntroduction
anchorPrerequisites
This article is exactly what you are looking for if:
- You are already comfortable with Ember.
- You know a bit of theory about what CSS modules are but you have never worked with them before.
- It is the first time you set up
ember-css-modulesin an existing Ember app that already contains a global CSS setup.
This article might get your interest if:
- You don't know a thing about CSS modules.
- After we've solved the previous point, you want to discover how CSS modules can be used in an Ember context.
anchorA word about CSS modules
To style an application with CSS, the minimum you need is one CSS file included on the page. Even when split into different files, having one CSS scope that applies globally on the whole page has some downsides in big and complex applications. For instance, managing the styles of reusable components is sometimes challenging. Also, the life of an application is made of turnover, it's never easy for newcomers to identify dead code, resulting in overly heavy and hard-to-clean CSS rules.
CSS modules aim to overcome these challenges as a technique to scope CSS classes locally, for instance to individual components. To read more about the general concept, have a look at the documentation on Github.
anchorA word about ember-css-modules
ember-css-modules is a nice addon that lets developers easily integrate the CSS modules approach to the implementation of their Ember apps and addons.
Installing ember-css-modules in an existing Ember app triggers some breaking changes in the way the developer should handle the app styles. If the developer is not familiar with CSS modules in the first place, they might have a hard time figuring out how to set up and start the migration at their own pace. The present tutorial is intended to be used as a quick start cookbook to achieve this.
anchorA word about less and sass
The usage of less and sass will not be mentioned in this tutorial, though they are compatible with ember-css-modules.
anchorMigration tutorial
Let's start working. We'll take the SuperRentals app as an example. SuperRentals is the great tutorial part of the Ember guides to introduce the main Ember features. As the purpose of the SuperRentals app is to teach Ember and writing CSS is irrelevant to the matter, the CSS to style the app is provided as a single app.css free to download (linked somewhere in the first pages of Part 1), so newcomers don't have to write it themselves as they walk through the tutorial.
So let's make the SuperRentals app ready for migration to CSS modules.
anchorInstall ember-css-modules (and break your app)
Let's suppose we have finished implementing the SuperRentals app. The following screenshot shows the page as it should be in your browser, with the nice styling provided in the tutorial:

To use CSS modules, let's install ember-css-modules:
ember install ember-css-modules
The addon does not contain any blueprints, the installation command simply adds the dependency to package.json and modifies the lock file.
Let's run the local server again and see how our app is doing:
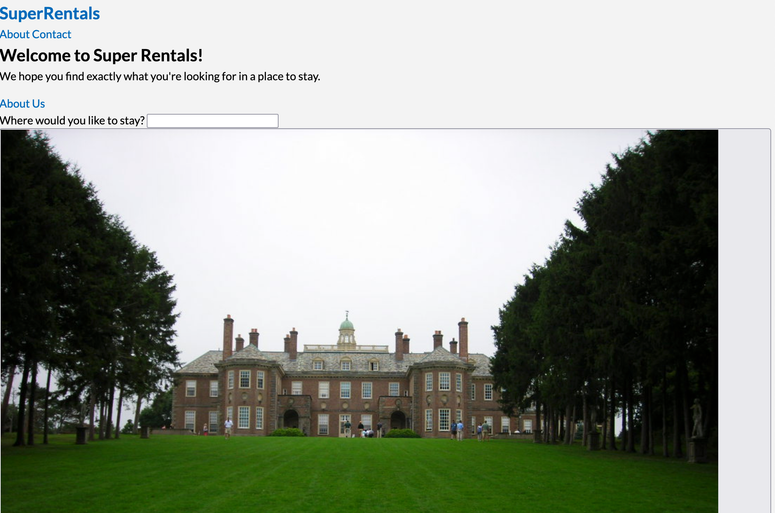
Ouch, all the styles are broken. What we see now in the browser is very similar to a page with no CSS at all. To understand what is going on let's use the inspector tab of the browser's debugger.
anchorUnderstanding CSS classes isolation
If we compare the previously styled app and the version we have now, we notice that Tomster (the Ember hamster mascot) is missing at the top right of the screen. Let's find the element that should display Tomster in the DOM. The image shows using the following approach:
<!-- app/components/jumbos.hbs -->

<div class="right tomster"></div>
/* app/styles/app.css */
.right {
float: right;
}
.tomster {
background: url(../assets/images/teaching-tomster.png);
background-size: contain;
background-repeat: no-repeat;
height: 200px;
width: 200px;
position: relative;
top: -25px;
}Now, let's have a look at the CSS applied on the <div> element:
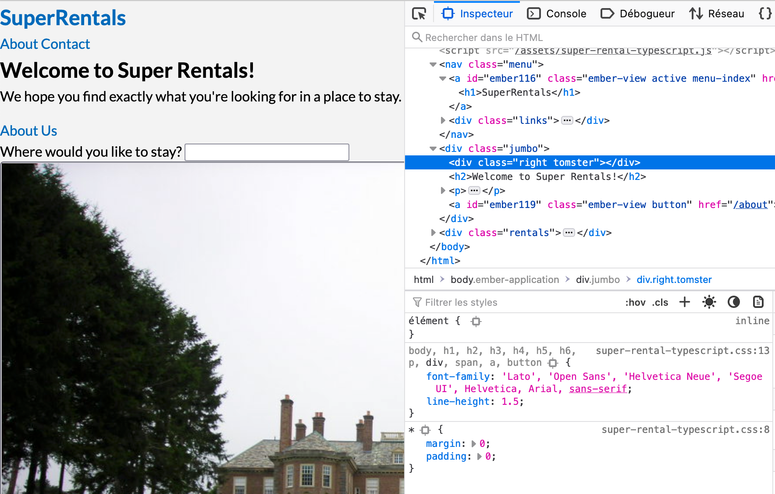
Only two CSS rules apply on the Tomster <div>. The first one is a global rule to reset margins. The second one defines the font family and line height set on elements such as body, h titles, p, div, etc... The CSS classes responsible for showing Tomster are .right and .tomster, but the rules corresponding to these classes are no longer there! that's why the Tomster image is no longer visible on screen.
In the section of the inspector dedicated to CSS description, when a style applies to the selected element, we can see the name of the CSS file this style comes from. On the screenshot above, it comes from super-rental-typescript, which is the name of this demo application (the final "s" on "rentals" was forgotten ^^' and it was first implemented as a migration test to TypeScript). The file name is clickable and lets you see the content of the whole CSS file.
At the top of the file, we read:
* {
  margin: 0;
  padding: 0;
}

body,
h1,
h2,
h3,
h4,
h5,
h6,
p,
div,
span,
a,
button {
  font-family: "Lato", "Open Sans", "Helvetica Neue", "Segoe UI", Helvetica,
    Arial, sans-serif;
  line-height: 1.5;
}
At the bottom of the file, we read:
._right_1s31t7 {
  float: right;
}

._tomster_1s31t7 {
  background: url(../assets/images/teaching-tomster.png);
  background-size: contain;
  background-repeat: no-repeat;
  height: 200px;
  width: 200px;

  position: relative;
  top: -25px;
}
And here is the explanation about our missing Tomster. With ember-css-modules installed, all the class selectors present in app.css end with a custom id. However, this custom id is not present in our component's template: we still have class="right tomster". As a result, no CSS class is found for .right and .tomster and no style applies. On the contrary, the rules defined for main elements like div match by the element itself and thus keep applying.
ember-css-modules relies on class selectors to isolate the CSS and prevent it from applying globally. The isolation system applies to every CSS file, including those located in the main styles folder rather than alongside a component.
anchorFix the setup with :global
Before starting to actively use CSS modules across the app, we should fix the styles and allow app.css to apply globally as it did before. To do so, we can use the :global pseudoselector:
/* app/styles/app.css */

:global(.right) {
  float: right;
}

:global(.tomster) {
  background: url(../assets/images/teaching-tomster.png);
  background-size: contain;
  background-repeat: no-repeat;
  height: 200px;
  width: 200px;

  position: relative;
  top: -25px;
}
And let's see what happens in the browser:
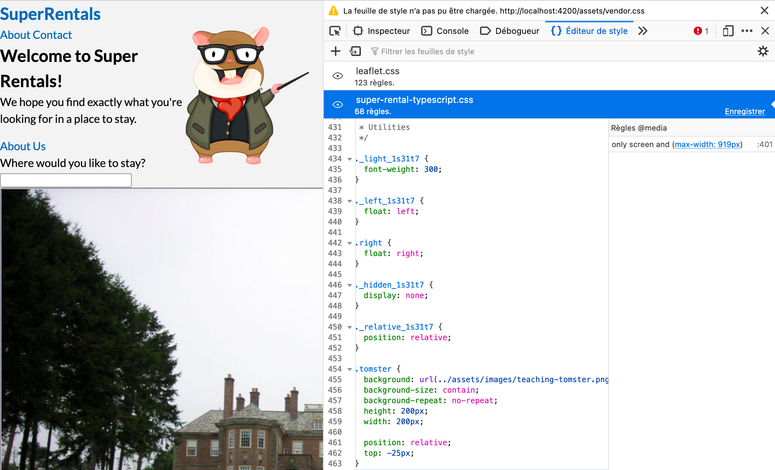
Tomster is back! If we take a new look at the generated CSS file in the browser's inspector, we can see this time the classes .right and .tomster don't have custom ids. The :global pseudoselector indicates these classes are global classes that should apply to the whole page. So we are back to classic CSS, with rules defined in app.css which apply to the page elements through class attributes. By using the :global pseudoselector on the whole existing CSS, we can style the whole app exactly as it was before installing ember-css-modules, and from there we can serenely start to use some CSS modules.
anchorStart using CSS modules
In the SuperRentals app, the Tomster <div> element is written in the <Jumbo> component's template (this component is instantiated at the top of each page). So let's create the CSS file alongside the template. In the present example, the file is app/components/jumbo.css as the app has a classic structure with co-location.
It would probably make sense if the .right class remains a global class that can be assigned to different elements of the page. But let's make the .tomster class local:
/* app/styles/app.css */

:global(.right) {
  float: right;
}
/* app/components/jumbo.css */
.tomster {
background: url(../assets/images/teaching-tomster.png);
background-size: contain;
background-repeat: no-repeat;
height: 200px;
width: 200px;
position: relative;
top: -25px;
}<!-- app/components/jumbos.hbs -->
<div class="right" local-class="tomster"></div>Everything should show as before:
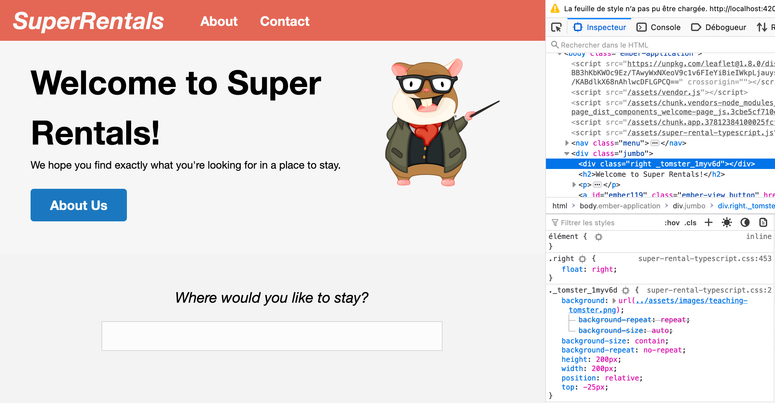
If we look one more time at the CSS classes in the inspector, we'll see that class .right is still applied globally, but .tomster selector now owns a custom id used to isolate the CSS. The syntax <div class="right" local-class="tomster"></div> we used in the template resulted in <div class="right _tomster_1myv6d"></div> in the browser so the class attributes and the generated CSS rules match.
anchorConclusion
We have drawn the big picture about how ember-css-modules isolates CSS. The way custom ids are assigned to selectors in a given CSS file is key to understanding and starting to work with ember-css-modules. With this in mind, it is up to you to continue digging and deduce the best way to organize CSS in your specific project.
As a next step, why don't you have a look at the composition feature? At first glance and without reading the docs carefully enough, it might look like "importing a CSS rule content", but that's not it. It is rather about adding to an element with a local-class an additional local-class coming from another file. So by using composes once, many different rules can suddenly apply to the element.
I hope you enjoyed this tutorial :)
